Showing posts with label how to. Show all posts

Monday, July 14, 2014

Reloved Window

I’ve always had a thing for old windows.  Years ago I dragged my dad out with his pick-up truck when a local nursery had changed out their windows and there was a stack of the oldies outside.  He was always game for my nonsense and we loaded up his truck.  I hoped to one day make a greenhouse with them but dad is now gone so…. so is that dream. 

I’ve since dug into the stash and done some upcycling.  You can see some of those projects here

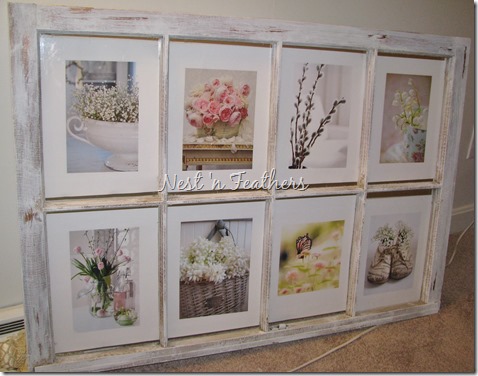
My latest project is similar to this one that I have over my bed….

0525 Window AFTER

I did this one for the shop……

Old window florals 1

I used waistband elastic to hold the pictures in place.  I glued two strands across each pane on the sides (you can see them below) so that the pics can be easily changed out.

Old window florals

NEXT!

Tuesday, May 28, 2013

Weathered Window & Wire


While I’m in window mode….why not do another.   I did this one a few days ago.  
0525 Window AFTER
The glass was intact so it was perfect for adding my flower pics to.  The next one was a little rougher.  No glass.  (Although they both had the same fuzzies and could have used a shave!)
0528 Key frame BEFORE 2
0528 Key frame BEFORE
Chicken wire to the rescue!
I didn't have a D-ring to hang it so I improvised.
I used a pop tab from a soda can and voila!
A new place to hang keys, the dog leash, etc.
0528 Key frame AFTER 2
Installed and ready to use. 

P.S.  If you’ve never used chicken wire, beware… it bites!

Sunday, May 26, 2013

Flowers & Weathered Wood

 Two of my favorite things!   As a matter of fact I was supposed to be outside planting flowers this weekend but Mother Nature had other ideas.  So instead I spent my time inside…. printing flowers.

0525 Window IMAGES

I needed some wall décor for my freshly painted breezeway  /mudroom so I pulled out an old window that I cleaned up earlier.

0525 Window BEFORE 1
There was an odd ‘fuzziness’ on parts of it –probably from being out in the rain.
0525 Window BEFORE 2
See?  I sanded it off as best I could but it was tough to get at without breaking any glass.

0525 Window BEFORE
I dry-brushed the paint on and lightly sanded with a sanding block.  That took care of the fuzzies pretty well.  Then I chose the photos for the frames.
0525 Window FRAME 1

0525 Window FRAME 2

0525 Window FRAME 3

0525 Window FRAME 4

I wanted the pics to be removable so that I could change them out seasonally so I added 2 bands of elastic to the back to hold the pics tightly to the glass.    They are  easily removable when I want to change them up.

0525 Window BACK
And this is the final result!  
0525 Window AFTER
Easy…and free!
I'm linking up to Catch as Catch Can hosted @ My Repurposed Life

Sunday, April 22, 2012

Bigger Isn't Better–OOK Picture Hangers


This post is less about what I did and more about what I found.  So no “before” just an “after” pic.

I painted this huge chalkboard over a month ago and it has been sitting in my garage ever since.
0420 Dresser Chalkboard

It’s big and heavy and I was worried about hanging it on the drywall in the shop for fear that it would come crashing down.   I finally decided that I was being silly.  First of all, it wasn’t going to sell sitting in the garage and, secondly, I was getting tired of moving it around when I worked on other projects! 

So off to the hardware store I went.    Looking for industrial sized picture hanging ‘equipment’.  Bigger is better, right?  

Since I prefer the local mom & pop stores that's where I headed.  I was greeted by a very helpful guy when I arrived.  I told him what I was looking for.   Already knowing in my head that what I needed were some big honkin’ wall plugs,  screws, etc…..a drill, hammer….    He suggested that I try these.

OOK Picture hangerHe told me that they are much easier to use and only require a hammer to install.  They hold up to 100 lbs.  No drilling for wall plugs, etc.  I was hesitant but he seemed to know what he was talking about.   Well let’s just say that it pays to ask questions.    I had the chalkboard hanging on the wall in less than a minute.

Lessons learned?   Use the local stores whenever possible.   Ask questions.  (That’s what they’re there for.)  I might still be standing in the aisle of the big box store with a blank look on my face.

Tuesday, February 28, 2012

Antique Chandelier–Part 2 – Rewiring, etc.


After the task of dismantling and cleaning the chandelier (posted here), it was on to the task of rewiring and putting it back together.
Chandelier wiring
First up. Opening the bottom to pull out the old wiring.   The old wiring that went into each of the “arms” was left alone since it looked “healthy”.     So I just pulled the main wire and connected a new one through the center.  I simply unscrewed the electrical connectors (black doodads).
Chandelier wiring 2
I intended on using a kit with an inline switch but because it was an older chandelier, the new wiring was too chunky to go through the narrow pipe.   I called a friend who has supplies (and skills) for virtually every project.
Chandelier SWITCH
Since she never disappoints, she had a smaller old electric cord and showed me how to install an inline switch.   Yahoo!  New skill acquired.

Chandelier diagram
Although my drawing skills might be lacking, this diagram helped me to put it all back together.

Chandelier BEFORE
As I started to put it back together I felt that the old gold’ish color was not really giving it what it was worthy of .  So.  I.  painted. it.
Chandelier CLOSE 2
Sacrilegious?  Perhaps.  But so much better!
Chandelier CLOSE 3

Chandelier CLOSE
Still a work in progress but the full reveal is coming soon.