Showing posts with label upcycle. Show all posts

Monday, July 14, 2014

Reloved Window

I’ve always had a thing for old windows.  Years ago I dragged my dad out with his pick-up truck when a local nursery had changed out their windows and there was a stack of the oldies outside.  He was always game for my nonsense and we loaded up his truck.  I hoped to one day make a greenhouse with them but dad is now gone so…. so is that dream. 

I’ve since dug into the stash and done some upcycling.  You can see some of those projects here

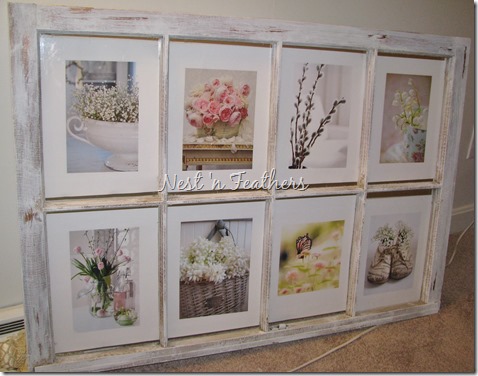
My latest project is similar to this one that I have over my bed….
0525 Window AFTER

I did this one for the shop……

Old window florals 1

I used waistband elastic to hold the pictures in place.  I glued two strands across each pane on the sides (you can see them below) so that the pics can be easily changed out.

Old window florals

NEXT!

Tuesday, July 23, 2013

Cape Cod Lobster Crate

I picked up this authentic lobster (pronounced ‘lobsta’ in this neck of the woods!) on Cape Cod last summer. 

IMG_0291
WARNING:  The only ‘after’  picture that I have is not even worth showing because the lighting inside the shop (or my less than spectacular photography skills) completely messed it up.  Ditz!

First I washed it by spraying it down with bleach and then I attacked  it with my mouse sander.  I liked the “Lobsters” on top but the fisherman’s initials on the side had to go. 
IMG_0292
My mighty Mouse sander to the rescue.  It was a glossy enamel red paint so it took some elbow grease but where there’s a will……

07 Lobster crate INSIDE
Dry brushed with white paint.
07 Lobster crate wheels 2
Installed some wheels…..

07 Lobster crate OUTSIDE 2
….. and this is the only ‘after’ish’ photo.   I added hinges to the top for easy opening.  
I went back a couple of days later to get a pic but it had sold!

Tuesday, May 28, 2013

Weathered Window & Wire


While I’m in window mode….why not do another.   I did this one a few days ago.  
0525 Window AFTER
The glass was intact so it was perfect for adding my flower pics to.  The next one was a little rougher.  No glass.  (Although they both had the same fuzzies and could have used a shave!)
0528 Key frame BEFORE 2
0528 Key frame BEFORE
Chicken wire to the rescue!
I didn't have a D-ring to hang it so I improvised.
I used a pop tab from a soda can and voila!
A new place to hang keys, the dog leash, etc.
0528 Key frame AFTER 2
Installed and ready to use. 

P.S.  If you’ve never used chicken wire, beware… it bites!

Sunday, May 26, 2013

Flowers & Weathered Wood

 Two of my favorite things!   As a matter of fact I was supposed to be outside planting flowers this weekend but Mother Nature had other ideas.  So instead I spent my time inside…. printing flowers.

0525 Window IMAGES

I needed some wall décor for my freshly painted breezeway  /mudroom so I pulled out an old window that I cleaned up earlier.

0525 Window BEFORE 1
There was an odd ‘fuzziness’ on parts of it –probably from being out in the rain.
0525 Window BEFORE 2
See?  I sanded it off as best I could but it was tough to get at without breaking any glass.

0525 Window BEFORE
I dry-brushed the paint on and lightly sanded with a sanding block.  That took care of the fuzzies pretty well.  Then I chose the photos for the frames.
0525 Window FRAME 1

0525 Window FRAME 2

0525 Window FRAME 3

0525 Window FRAME 4

I wanted the pics to be removable so that I could change them out seasonally so I added 2 bands of elastic to the back to hold the pics tightly to the glass.    They are  easily removable when I want to change them up.

0525 Window BACK
And this is the final result!  
0525 Window AFTER
Easy…and free!
I'm linking up to Catch as Catch Can hosted @ My Repurposed Life

Monday, December 3, 2012

Recycled Christmas

I must admit I am very….ummm….feeble….in the holiday decorating department in my booth. I keep it to a minimum and tend to integrate things that can be used after the season is over.
I use recycled items when I can so it mostly comes down to what I have on hand. A few years ago I came across a daycare center that was replacing their windows and there were stacks of them - free for the taking. (I’m still working on that stash.)
This one is in it’s second life.   Four years ago, I (with help) built a cold-frame so I could start seeds earlier in the Spring. It served me for 4 summers but this year the glass and cross bars were falling out so I took it apart. Removed the innards and bleached the beautifully weathered frame.
I intended to attach chicken wire to make a note board / message center but the roll was 2” too narrow.   Now what?   I was going to staple the inside of the frame.
I started to do this but I found that the wire could be stretched far enough to be stapled to the back of the frame. Perfect!
 
The berry wreath would be my way a Christmas-izing it!
 
See. Feeble!

Saturday, December 1, 2012

Nature’s Bounty


I am an outdoor lover.  I love walking in the woods and swimming in the ocean.  I probably should have been born with fur… or gills.  I especially love the crisp fall air.  So, last weekend, I headed out to a local pond.  Snips in hand and look what I found….

1124 Clippings

 1124 Clippings 2
1124 Clippings 3
Makes me think of that old song … “.......and I said to myself, what a wonderful world”. 
1124 Clippings 5
Really.  Take a look around.  Mother Nature knows what she is doing!   How blessed are we?

P.S.  The ‘snow’ in the vase is epsom salts.  Such a thrifty project!   More on the frame in my next post.  This is it's 3rd life!

Saturday, April 14, 2012

Upcycling Old Cabinet Doors


A few months ago while scouting a local salvage yard (a la Sanford & Sons kind of salvage yard) I came across a trio of old, crackled cabinet doors.  Crackled to perfection.

So, up first.   The first door was upcycled to a frenchy sign.  No sanding and I left the old hardware intact.

0226 French Sign
Painted, stenciled, distressed and sprayed with a clear spray.  I bought the stencil from http://junkinjunky.blogspot.com/.   (SOLD!)

Door No. 2.  (I feel like I’m channeling “Let’s Make a Deal”)  took a different route.    I painted them both at the same time but I couldn’t decide what I wanted to do.  A few days ago it struck me so I gathered some supplies.

0331 Mason Jar Supplies
Mason jars, adjustable metal clamps, L-brackets and tools.

0331 Mason Jar MIDWAY
Attach L-brackets and clamps.
0331 Mason Jar AFTER 1
Insert jars & fill with sea glass.

0331 Mason Jar AFTER 2
I love the crackled patina on these doors.

0331 Mason Jar AFTER 3

0331 Mason Jar AFTER 4
Tomorrow I’ll pick up a few flower stems and off to the shop it goes.

Saturday, March 31, 2012

Whitewashed Old Pine Trunk


I have to say my mind can be all over the place.   I typically have my project line-up floating around in my head as each new week rolls around.  This one wasn’t even on my radar.

0325 Trunk BEFORE
A beat up old trunk with plenty of dings.
0325 Trunk OPEN
I could either try to sand out the dings or work with them.
0325 Trunk HARDWARE
I removed the hardware and soaked it in a solution of hot water, vinegar and salt.   I cannot believe the amount of yuck that comes off.  I figured since it’s metal it wouldn’t be too bad.    Au contraire.  I let them soak for at least 24 hours and the stuff that was floating around……well, just yuck.

0325 Reunk CLOSE 2
I decided to whitewash this one.  Mixed up some paint and water and rubbed it on with a cloth.  The dings are even more visible and I’m kind of liking it.  (Plus, not sanding saved on a bunch of elbow grease!)

0325 Trunk PAINTED
The wood soaked up the whitewash and it was a little on the blotchy side so I distressed it a bit.

0325 Trunk AFTER
The decorative corner pieces were nixed.  They didn’t “go” with the new finish.  I forgot to take a picture of the side handles but the got a rub down with silver Rub & Buff and were distressed to let a little of the original black color.   Then buffed with Johnson’s Paste Wax and within 24 hours it was “looking for love”  in the shop.
Linking up with: